-
Files needed:
- smartdrv.exe
- TFTPD Server
- pxelinux.0
- memdisk
-
Download and unzip TFTD Server, create Folder “root”.
-
Start TFTP Server
-
Settings:
- Server Interface: Choose the right NIC
- DHCP Server:
Start Pool: 192.168.2.40
Size of pool: 4
Boot File: pxelinux.0
WINS/DNS Server: 192.168.2.1
Default Router: 192.168.2.1
Mask: 255.255.255.0
->> Press Save
- Under "Seetings"
Base Directory to the created "root" Folder
TFTP Security "None"
PXE Compatibility
->> Press OK
- Copy memdisk, pxelinux.0 and smartdrv.exe to the root Folder
- Also copy kernel.dat and ramdisk.dat from the Acronis Resuce Disc into the root Folder
- create pxelinux.cfg Folder within root
- create File with Name “default” (no .txt or such!) with following stuff inside:
LABEL acronis
KERNEL kernel.dat
APPEND initrd=ramdisk.dat vga=791 ramdisk_size=32768 acpi=off quiet noapic
- Connect the Laptop to the Network, choose PXE / NIC as Bootmedia in the BIOS.
- Let that thing boot to PXE and enter acronis at the boot: prompt
- Have fun!
Orginal taken from: http://www.networkcomputing.de/aus-dem-testlabor-linux-pxe-server-fuer-restore-mit-true-image-bereitstellen/seite/2/?no_cache=1
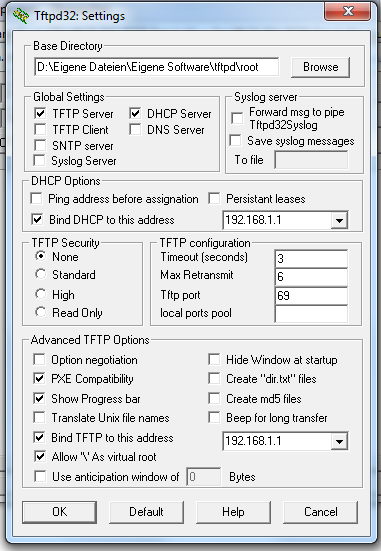
The DHCP Settings are important as well!
Also set firewall to off!
Comments are disabled until you accept functional cookies.