labSentinel 2

About nearly a year ago, I wrote the labSentinel project for my Nvidia Jetson AI Specialist certification. The basic idea of the project is to be able to supervise old Lab Equipment which does not poses any kind of log output or interface other than a graphical user interface, running on an Windows 3.11 / 95 / NT - maybe even XP system. I solved this issue by using a video grabber attached to a Jetson Nano and "out-of-band" grabbing the screen output of the experiment computer. I then learned good and bad system states via Nvidias Inference tools and finally got the system to report via MQTT as soon as something did go wrong. (As a "test system" I designed a flashy GUI application to try to mimic the old interfaces - specifically thinking about a lab power supply with multiple outputs - and the ability to simulate errors.)(https://developer.nvidia.com/embedded/community/jetson-projects#labsentinel / https://github.com/nmaas87/labsentinel)

While the project did work, there was still a lot left to be desired:

  • The system did capture the complete screen in full size. Running inference on a 1024x768 or even higher resolution picture is not efficient and has a high failure rate.
  • Training, testing and improving the model was time consuming and did not yield the precision and results I was hoping for.
  • The system could differentiate between "good" and "error" states - however if an error occurred, I would have loved to get more information - "reading the GUI" and its output. For example in the lab power supply use case, getting the specific voltages of the different lines to see which line failed or what is wrong - maybe even with the possibility to cross check if the detected error is an error in the first place
  • While the Nvidia Jetson Nano Development Board is an awesome tool for development, it is not hardend enough / suited for a lab or even factory floor environment.

These were all points I wanted to address, but as time was lacking - I did not take up the project again - until the start of this year Advantech and Edge Impulse started their Advantech Edge AI Challenge 2022. They wanted to know about specific use cases and how to solve them with factory hardend Jetson products (e.g. Advantechs AIR-020 series) and Edge Impulse Studio.

Well, that reminded me of the first labSentinel - and I thought I'd give it a try. As luck would have it, I actually was one of the two lucky guys who were picked to be able to realize their project. Advantech sent me one of their AIR-020X boards (review is here :)) and I was good to go:

Let me introduce you to labSentinel 2:

Build from the ground up, it does solve the above mentioned issues:

  • The actually GUI window is found and extracted from the "full size Desktop screenshots" via OpenCV 2 - and resized to 320x320 pixels to neatly fit the inference model
  • All model training, testing and optimization is done with Edge Impulse, which makes handling a breeze
  • If an error is detected and included OCR module using tesseract can extract text from predesignated / labeled areas on the non-resized GUI and sent this information along with the MQTT alert
  • The AIR-020X board is more than robust enough for all normal lab and factory floors

All source code is freely available with a demo project and documentation on Github ( https://github.com/nmaas87/labSentinel2 ) and also a video instruction on how to use it ( https://youtu.be/KEN_HT20exs )

Thanks again to Gary Lin (Advantech) as well as Louis Moreau and David Tischler (Edge Impulse) for their support :)!

Update: I added a Review to the Advantech AIR-020X and got balenaOS working on it.
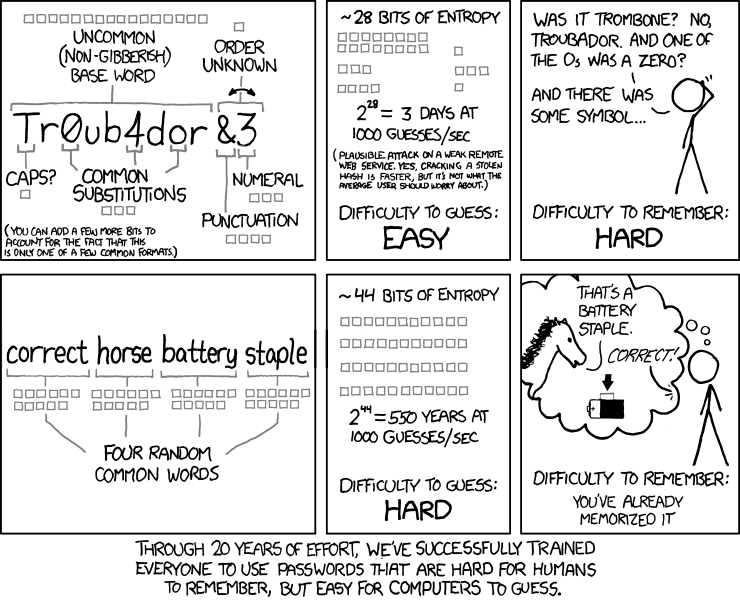
xkcdpass - secure passwords for transport

Passwords are problematic. Always. Especially during COVID-19 - were you have to securely transport data via insecure means. What I want to say: Sending confidential data via email. Actually, thats quite easy: (7)-zip everything with AES256 using a long enough key - transfer the key via additional, more secure lines of communication (e.g. phone) and you are ok for the most part.

However, spelling %-FoPN#~OeJQ0h9g3_JWrvnq9h^ip))srzg{\vnj via phone is "a bit cumbersome". Thats the moment you recall Randall Munroe's xkcd #936 Password strength:

And with this basic idea, xkcdpass was born. It can generate passwords from multiple dictonary entries, seperated by some symbols and generate things like showcase surging swoosh bakeshop smoked duffel - and you can also tweek the settings to change the amount of words used, length, delimters, etc.

It is written in python and can be installed via a quick pip install xkcdpass and then used with the command line paramter xkcdpass

All infos are in the Git repo found here.

Long enough sentences are good enough - and are awesome as "transfer keys" to secure the real data.

[VMWare] Get and upgrade ESXi 6.5 "offline" - without paid license

As I wanted to have a very recent version of ESXi, I went to VMWares website and checked out their Products, Free Products, vSphere Hypervisor section. This, however, only presented me with a ESXi 6.5.0a ISO from 02.02.2017 - too old. However, you'll get the much needed free license - so the visit pays off :).

So to get the latest version and updates, you need to go to http://vmware.com/go/evaluate-vsphere-en - and are presented with the 6.5.0 U1 ISO from 27.07.2017 - a lot better. With said image you can then install your server. Even if you had an old 6.5.0a install, you could download the VMware vSphere Hypervisor (ESXi) Offline Bundle - which will upgrade your old 6.5.0 installation to U1 from that site.

After that, you'll need to check out the very useful VMWare ESXi Patch Tracker on https://esxi-patches.v-front.de/ESXi-6.5.0.html. There you can see, which patches are needed to get your ESXi host to the latest version (in my case I only need to apply the 2017-10-05 patch series to get from U1 to latest). So now switch over to https://my.vmware.com/group/vmware/patch#search and look for ESXi 6.5.0 patches. I did find my needed ESXi650-201710001 patch with release date 05.10.2017 - and downloaded it. From the ESXi Patch Tracker I now know, that the Imageprofile of said Update is called ESXi-6.5.0-20171004001-standard and uses the Buildnumber 6765664. I then enabled SSH on the ESXi Host, shutdown all VMs, put the ESXi Host into Maintance mode and uploaded the ESXi650-201710001.zip to a folder on my Datastore datastore01 into a folder I created called ESXiUpdate.

After that, I could execute said update via SSH with the command esxcli software profile update --depot="[datastore01]ESXiUpdate/ESXi650-201710001.zip" --profile ESXi-6.5.0-20171004001-standard

As you can see, it needs to provide the path to the patch file, as well as the Imageprofilename we found out earlier via the ESXi Patch Tracker. After the successful installation, a reboot is need.

As soon as the machine has booted again, login and check if the Buildnumber now matches the Updates Buildnumber. If this is true, disable the Maintenance Mode, restart the VMs and you're good to go.

If other patches need to be applied, you would re-enable SSH  access, not restart the VMs and not disable the Maintenance Mode and just keep on uploading and applying the updates :).

More infos abot the esxcli commands can be found here - and you can still use your free license with ESXi 6.5 which you acquired at the first steps of this weblog - even if you use the most recent patch (luckily!).

And now, get those machines patched ;)!

Rogue One: My first field pentesting

Earlier that year, very - earlier - I had one technician of an international company calling me for some advice. She/He had a problem with the local networking staff and their "modus operandi" regarding network security. The company had a big assembly line and very powerful, automated machinery - which made the leaky security all the more troublesome. My job was to exploit one of those security holes and show - as clearly and easily as possible - said problems - so that they were getting finally fixed.

The first stage of the whole testing was the usual: Reconnaissance. Though, in this case, this was very easily achived, as my contact handed me over parts of the firewall ruleset as well as an access to their office lan. First thing that lit up like a christmas tree: They actually had the production and office networks seperated by a firewall - which is good. For the bad part: They did drop everything. Everything except everykind of ICMP packets. Well. Damn.

Second stage was to create an exploit to that happy little mishap: My contact wanted to be able to bridge office and production networks and access them via the - according to the networking department - water tight secure firewall. The exploit needed to be able to run on a Windows 7 machine as well. With that in mind, I went through different ICMP tunnels: HANS and Dhaval Kapils icmptunnel were the first one to be dropped from that list, as they did not satisfy all constrains. In the end, I choose icmptunnel or short ptunnel. With a bit of manual patching, I could get it to compile and work again on Windows, thanks to the efforts of Mike Miller.

For testing I recreated the network and firewall using a Cisco 1841 and a Cisco 3560 switch. As I needed to integrate ptunnel into the production network, I wanted it to look as innocent and  inconspicuous as possible: So I used a Raspberry Pi 3 and dumped it into a DIN Rail case - then I outfited it with a Power over Ethernet adapter and could serve it network as well as power over said network connection.

The tests worked flawlessly and I even cramped enough speed over ICMP to get some remote desktop working.


On to stage three: Attack.

This stage turned out to be way cooler than thought: Due to certain circumstances, we meet at night, 0 dark thirty - you could say - and sneaked through the production line, past workers which did not take much notice in my presence. I inserted the "Rogue Pi" into one closet next to an Siemens Human-Machine Interface and plugged it into the network switch.

Then we left again. Back in the office, I tried to connect to my little helper and was immediately rewarded with a working ICMP tunnel - now transfering an SSH connection as payload. From that moment on, I could connect to a dozend different systems from different vendors in that production network. Last but not least, as "visual" demo, we created a little batch script to start the connection and connect to the Remote Desktop Interface / Human Machine Interface of a very heavy and very unsecured press - now leaving it to our control.

At this point, said connection was only opened in a "read/view only" mode so that - even by accident, we could not harm anyone. We had to bear in mind that this multi-hundred ton press was now at the mercy of our fingertips and we did not wanted to wreck hevoc at all costs - so - if you're conducting field exercises with real "heavy hardware" - find a way to interact safetly with that - before you engage any connection to it.

With this preparation, the technician was able to run the demo in front of the higher ups and finally got the attention, permission and support needed to bring security to a higher standard.

So that effort paid of in the end for the production security of that company - and rewarded me with my first - and hopefully not last - field pentest :).


[Dell] Using the Update CDs to get Dell Servers to latest firmware

Dell has an very comfortable way of getting new firmware to nearly all of its server components: The bootable media / ISO or Update CDs. You can find them on this website and very useful. On a basic level, you pick your server, download the ISO, compare the MD5 checksum and burn the ISO onto a DVD. After that, you should get the Servicetag of your server and check for BIOS and iDRAC updates - these should be installed manually first. After that, boot from the DVD and let it install all the needed firmware. Basically, the DVD will cycle through all firmware of components ever installed in the series of your particular server and installs updates if needed. After another reboot, you're done :).

Thanks Dell for being so helpful to your users! 🙂

SSH config for beginners

The SSH config is a powerful tool to get "more" out of your normal SSH connection.

Just create an file called "config" in your .ssh folder and it will be used on a new SSH session.

Lets start with a simple example of how a connection configuration could look like:

Host myHost
  Hostname 1.2.3.4 
  IdentityFile ~/.ssh/myHostKey
  User myUser

With this code, an "ssh myHost" will try to connect to the host 1.2.3.4 - using the user myUser and the keyfile myHostKey. And with this - you can use multiple keys and users on the same host without too much trouble 🙂

Another example with different ssh port:

Host myHost2
  Hostname myhost.com
  Port 3001
  User anotheruser
  IdentityFile ~/.ssh/anotherKey

You can also just give your ssh connection another keyfile:

Host github.com
  IdentityFile ~/.ssh/github

Forward a local port from your remote pc to yours:

Host myHost_tunnel
  Hostname myhost.com
  IdentityFile ~/.ssh/myHostKey
  User myUser
  LocalForward 443 127.0.0.1:443

Or even use your remote host as HTTP proxy (binding on your local port 8888):

Host myHost_proxy
  Hostname myhost.com
  IdentityFile ~/.ssh/myHostKey
  User myUser
  DynamicForward 127.0.0.1:8888

And the ssh config is even able to do a lot more but ... you'll find that in the manpage of ssh 🙂

SSH and Git on Windows (with Public\Private Key Authentication)

This Blog Post consists in huge parts of Daniel Hüskens awesome work, but I still had to rewrite it a bit as I tended to add some stuff on :).

1.) Download latest Git for Windows: https://git-for-windows.github.io/

2.) Install (Entires with * can be changed to your own liking, ** can be changed, but this setting is recommended)

  • "Without Windows Explorer Integration" *
  • "Run Git and included Unix tools from Windows Command Prompt"
  • "Use OpenSSH"
  • "Checkout Windows-style, commit Unix-style endings" **
  • "Use Windows default console window" **

3.) Configure

  • set set HOME=%HOMEDRIVE%%HOMEPATH% in your Windows User Path Variables: Press WIN+X Key, choose System, Advanced Systemsettings, Advanced, Path Variables - or just press WIN+R and enter "C:\Windows\system32\rundll32.exe" sysdm.cpl,EditEnvironmentVariables- you will need to click on New, then create a new Variable HOME  with the Value %HOMEDRIVE%%HOMEPATH%, click ok and close everything.
  • create the Folder .ssh in your User Folder (C:\Users\YourName\)
  • if you want to store your ssh Config and Credentials somewhere else, you need to use a symlink. Start your CMD in Administrator Mode (Press Windows Key, type cmd, rightclick on the found program, start as Administrator) and create the link with mklink /D "C:\Users\YourName\.ssh" "D:\mySecretFolder\.ssh" The path D:\mySecretFolder\.ssh does have to exist before this action, .ssh in the YourName folder not :).

4.) Create a key and test access to Github

  • Go to your .ssh folder and open a CMD there
  • ssh-keygen -t rsa -C "a good comment on what this key is for" -b 4096
  • Your key has been created, it should be named id_rsa and id_rsa.pub. The content of id_rsa.pub can be added as new ssh key to your Github profile on: https://github.com/settings/keys
  • After that you can test your setup with ssh -T git@github.com
  • If anything goes wrong, add verbosity to your SSH command, i.e. with -vvv (more v's equals more debug messages)

5.) Word of advice:

SSH can be a bit tricky, as it tends to only look for id_rsa named keys in your .ssh folder. So if you have multiple keys with different names chances are high that this won't work. However, you can get around that with entries in the user defined ssh config file (called "config" and placed in the .ssh folder of the user) to tell ssh which key to use with which ssh connection. I will add a post on that topic later and link it here.
EDIT: Here is the link

Blog Defacement

While I am now hosting this blog for nearly 9 years - without any incident - problems tend to happen sooner or later. A lot of hassle and problems has been reduced due to the WordPress Auto Update system - so to update WordPress itself, as well as its plugins - and it works great. However, WordPress introduced - and enabled by default - a REST API - which has a great deal of security problems. And without me always checking each installed version - well, I did not know that... The REST API problems should be fixed by now, but - that came a bit too late for my blog. Nonetheless, I would recommend going to Jetpack -> Settings and disabling JSON API - especially if you're not using it... I learned it the hard way ^^'..

PS: If you disable it, WordPress.com won't be able to talk to your website anymore so... You're gonna have a bad time, if you need that :/. You'll need to decide for yourself...

Regards

Keybase.io got a new Client - and it is awesome!

Finally, Keybase.io got a new Client and it is looking gorgeous: https://keybase.io/.

They added a graphical client to the CLI and included a Chat, as well as the File transfer and Search options. So now, Keybase.io got more easy to use than ever before - and the best thing: A mobile client is soon(tm ;)) to be released.

Actually I missed the release of the client and would not have stumbled upon it, if it weren't for johanbove how send me an encrypted message via the client - and Keybase let me know via email that I got something encrypted waiting for me ;).

Seems like Johan read my last post about Keybase.io and decided to drop me a encrypted message - and as you see, thats the real power of Keybase: You just got to know someones Github/Twitter/Website/WhatEver Account Name - and you can drop her/him an encrypted message, file or chat. And that is infact the point where Keybase.io shines above the regular PGP solutions - it is PGP for the social web :).

So - cheers Johan, thanks for the message - and lot of fun for the rest of you, maybe we connect on Keybase.io - I won't give you my page now - I trust you'll find me very easily ;)!